- Introduction
- Getting Started
- The interface’s structure
- The application’s logic
- Useful Links
- Conclusion
Introduction
Before anything, I would like to say that english is not my mother tongue. I speak french. So be nice :-)
Feel free to email me or to leave a comment if you see any kind of mistake. I’ll appreciate it. Thanks.
I have already done a todo app in angular 2: check out this post. My goal this time was to build it in a Redux way, following the Flux pattern. The fact is, I daily use React at work so if I can have the same architecture with angular, I’m going to be able to go fast. And I like Redux and Flux by the way :-) If you would like to have the github link of the project or try the app, go to the Useful links section.
Getting Started
Make sure you have have NodeJS and Git installed on your machine. Then do this:
42sh> # install webpack, webpack-dev-server and typings globally
42sh> npm i -g webpack webpack-dev-server typings
42sh> git clone https://github.com/kgosse/ngrx-store-todoapp.git
42sh> cd ngrx-store-todoapp
42sh> npm i
42sh> npm start
If everything is ok, open your browser and go to: localhost:8080
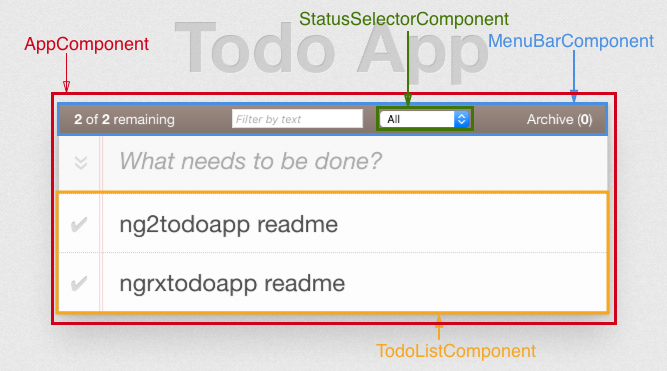
The interface’s structure
Here is how the user interface is structured :

The application’s logic
First of all, I’d like to pay tribute to the guys behind ngrx. They provide everything you need to build a redux-like app with angular 2. Also, as ngrx gives Reactive Extensions for angular2, you should be comfortable with RxJS. You can find more interesting resources about it in the Useful links section.
The Store
The store is like the big “model” of the app. It handles all the app’s data. So for this quite simple project, here is how the store (AppState) is designed:
// src/interfaces/AppState.ts

export interface AppState {
    todos: Todo[];
    filters: Filters;
}

// src/interfaces/Todo.ts

export interface Todo {
    done: boolean;
    editing: boolean;
    text: string;
}

// src/interfaces/Filters

export interface Filters {
    text: string;
    status: string;
}
For the filters, the text attribute handle the value of the input text inside the “MenuBar”. The status attribute is for the select input (StatusSelectorComponent).
The Actions
I hope you already know how the Flux architecture works. You need to have actions (which are const variables) that are going to be triggered (or dispatched) by your views in order to update the Store (which is the state of your app).
// =======> src/actions/todos.ts

/**
 *  action types
 */

export const REMOVE_TODO = '@@todos/REMOVE_TODO';
export const TOGGLE_TODO = '@@todos/TOGGLE_TODO';
export const ADD_TODO = '@@todos/ADD_TODO';
//...

/**
 *  action creators
 */

export function addTodo(payload) {
    return {
        type: ADD_TODO,
        payload
    }
}

export function removeTodo(payload) {
    return {
        type: REMOVE_TODO,
        payload
    }
}
//...

// =======> src/actions/filters.ts

/**
 *  action types
 */

export const TEXT_UPDATE = '@@filters/TEXT_UPDATE';
export const STATUS_UPDATE = '@@filters/STATUS_UPDATE';

/**
 *  action creators
 */

export function filterByText(payload) {
    return {
        type: TEXT_UPDATE,
        payload
    }
}
//...
The Reducers
the goal of a reducer is to update the state according to the emitted action. As the AppState has two attributes, I have created two reducers.
// ========> src/reducers/todos.ts

import {ActionReducer} from "@ngrx/store/reducer";
import {ADD_TODO, REMOVE_TODO, TOGGLE_TODO, TOGGLE_ALL, ARCHIVE, TOGGLE_EDITING, UPDATE_TEXT} from "../actions/todos";
import {Todo} from "../models/Todo.model";

const persistedTodos = JSON.parse(localStorage.getItem('todos') || '[]');

const todosInitialState = persistedTodos.map( (todo: {_text: String, done: Boolean}) => {
    let ret = new Todo(todo._text);
    ret.done = todo.done;
    return ret;
});

export const todos:ActionReducer<Todo[]> = (state = todosInitialState, {type, payload}) => {
    switch (type){
        case ADD_TODO:
            return [payload, ...state];

        case REMOVE_TODO:
            return state.filter(t => t !== payload);
        //...
    }
};

// ========> src/reducers/filters.ts

import {ActionReducer} from "@ngrx/store/reducer";
import {Filters} from "../interfaces/Filters";
import {TEXT_UPDATE, ALL, STATUS_UPDATE} from "../actions/filters";

const initialState: Filters = { text: '', status: ALL };

export const filters:ActionReducer<Filters> = (state = initialState,  {type, payload}) => {
    switch (type){

        case TEXT_UPDATE:
            return Object.assign({}, state, {text: payload});
        //...
    }
};
The Effects
Here’s where ngrx becomes very handy with ngrx/effects. I needed to save the todos’ state to the local storage after some specific actions. With React and Redux, there’s redux-saga that helps you managing “properly” side effects before or after an action is emitted. ngrx/effects does exactly the same as it is based on redux-saga. So I’ve been able to solve my problem by doing what follows:
// src/effects/app.ts

import {Injectable} from "@angular/core";
import {Effect, StateUpdates} from "@ngrx/effects";
import {AppState} from "../interfaces/AppState";
import {ADD_TODO, REMOVE_TODO, TOGGLE_TODO, TOGGLE_ALL, ARCHIVE, UPDATE_TEXT} from "../actions/todos";


@Injectable()
export class AppEffects {
    constructor(private updates$:StateUpdates<AppState>) {}

    @Effect() storeTodos$ = this.updates$
        .whenAction(ADD_TODO, REMOVE_TODO, TOGGLE_TODO, TOGGLE_ALL, ARCHIVE, UPDATE_TEXT)
        .map((data) => {
            localStorage.setItem('todos', JSON.stringify(data.state.todos));
            return data;
        });
}
Use case: show all the completed todos
When the user selects “done” inside the select input, an action (STATUS_UPDATE) is emitted
//  ====> src/components/status-selector.ts

    changeStatus$ = new Rx.Subject()
        .map((status) => filterByStatus(status));

//  ====> src/actions/filter.ts

export function filterByStatus(payload) {
    return {
        type: STATUS_UPDATE,
        payload
    }
}
Then the store is updated accordingly. After that, todo-list.ts renders the todos taking into account what’s inside the filters attribute of the application store.
  // src/components/todo-list.ts

  *ngFor="let todo of (todos | async) | status: (filters | async).status | text: (filters | async).text"
I know I didn’t give too much details because I think if you’re familiar with the libs I used, these are basic concepts. Otherwise, feel free to leave a comment below or to email me and I’ll do my best to improve the post.
Useful Links
Conclusion
I’m very happy with this project. I think I’ve found my architecture and my stack for angular 2. I can try to do some more complex projects now. Thanks for reading :-)